As I’m travelling quite a lot, this heavily influenced my IT setup over the last years. Back in the past I had a desktop computer and a lighter laptop for travelling (e.g. the Dell XPS 13), but with the start of the Working Holiday in Australia I ditched my 2015 XPS 13 for a powerful Asus ROG Zephyrus G14, allowing me to do everything from virtual machines to gaming on the go. I like this setup, but I would not call the laptop a really mobile device, as the battery life is somehow limited and it’s always better to have the (heavy) charging equipment with you, also because without that you only have a limited performance. But packing and unpacking the complete setup every time for a trip (sometimes once or twice a week while I’ve been in the Australian outback) was actually really annoying, so I was looking for other ways to solve that with mostly already available equipment.
Last year I had to send my G14 into service as the keyboard got broken and was unresponsive, so I created a setup to access my (in Germany located) desktop computer remotely from Australia. On hardware side this just required a smart WiFi plug (for example this one) to turn on the computer remotely, while on software side I’ve used Tailscale to create a secure network between my devices and Remote Desktop to actually connect to the user interface. With this setup I could use my light iPad with a foldable Bluetooth keyboard and mouse to access and use my computer from whereever I had an internet connection. Obviously there was a slight delay because of the 15.000 km distance, but all in all this was a reliable setup and a similar I’d like to achieve for my laptop. Sadly this doesn’t work the same way, as the ROG Zephyrus G14 (at least in my 2022’s configuration) does not have Wake on AC, that launches your computer once it receives power again (which was triggered by the smart plug in my desktop setup). Also it does not have Wake on LAN, where I could use a “magic packet” to wake up the device from at least energy saving mode. As keeping the laptop running for days is also not an option I had to find a different way to turn the device on remotely – and this is where I started playing around with a Raspberry Pi.
While researching I discovered that specific Raspberry Pis can simulate USB keyboards and mice. And I already knew, that pressing any key on the laptop keyboard was waking the device up from energy saving mode and that this was also working for connected USB keyboards. So my plan was to make a via USB connected Raspberry Pi behave like a keyboard and wake up the laptop by sending some fake key presses. The command to do so should be received remotely, where I ended up with an SSH solution.
Requirements
In terms of hardware you need the following:
- A Raspberry Pi Zero 2 W (around 20€)
- Optionally a wonderful case (around 5€)
- A USB SD card reader in case you only have Linux in a virtual machine
- A microUSB cable with data support
In terms of software the following is required for the setup:
- A Linux installation (a virtual machine is fine)
- A free Tailscale account to connect to the keyboard remotely in a secure way
I did basically everything on my Windows 11 device, just building the kernel to enable the wake up required a Linux installation, for which I used an Ubuntu virtual machine with VMware Workstation. You can either install it yourself or use prebuilt installations online (though I’d always recommend to install it by your own). And don’t be scared of building the kernel by yourself, it’s not that complicated.
Install Raspberry Pi OS and connect via SSH
Once you got the Raspberry Pi Zero 2 W in your hands it’s time to prepare the system. That works pretty easy with the Raspberry Pi Imager available for all systems, where you select the Pi Zero 2 W, the latest Raspberry Pi OS version (in my case Debian Bookworm as 64-bit; make sure to remember this) and the SD card.
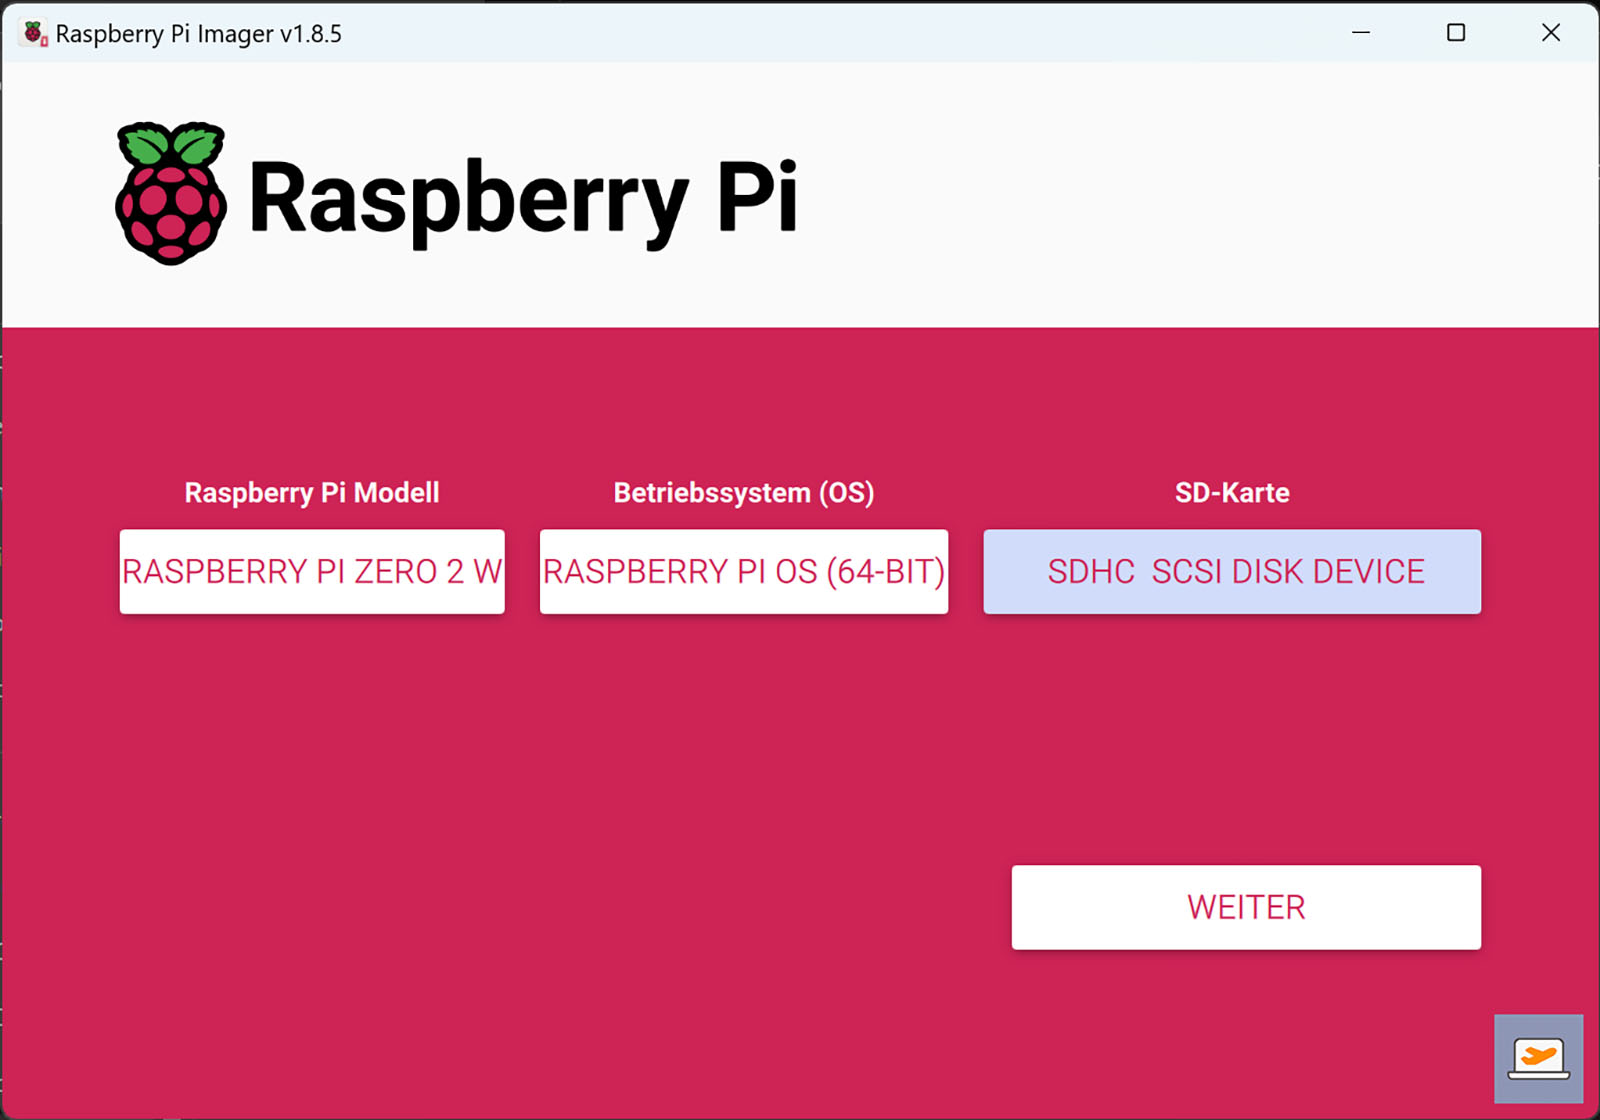
In the next window you can setup the configuration, where I’d recommend to setup a user and password to access the device via SSH and the connection to the first WiFi. Also make sure, that SSH is enabled in the Services tab. Then click on Continue, accept the warning that everything on the SD card will be erased and wait until the installation is completed.

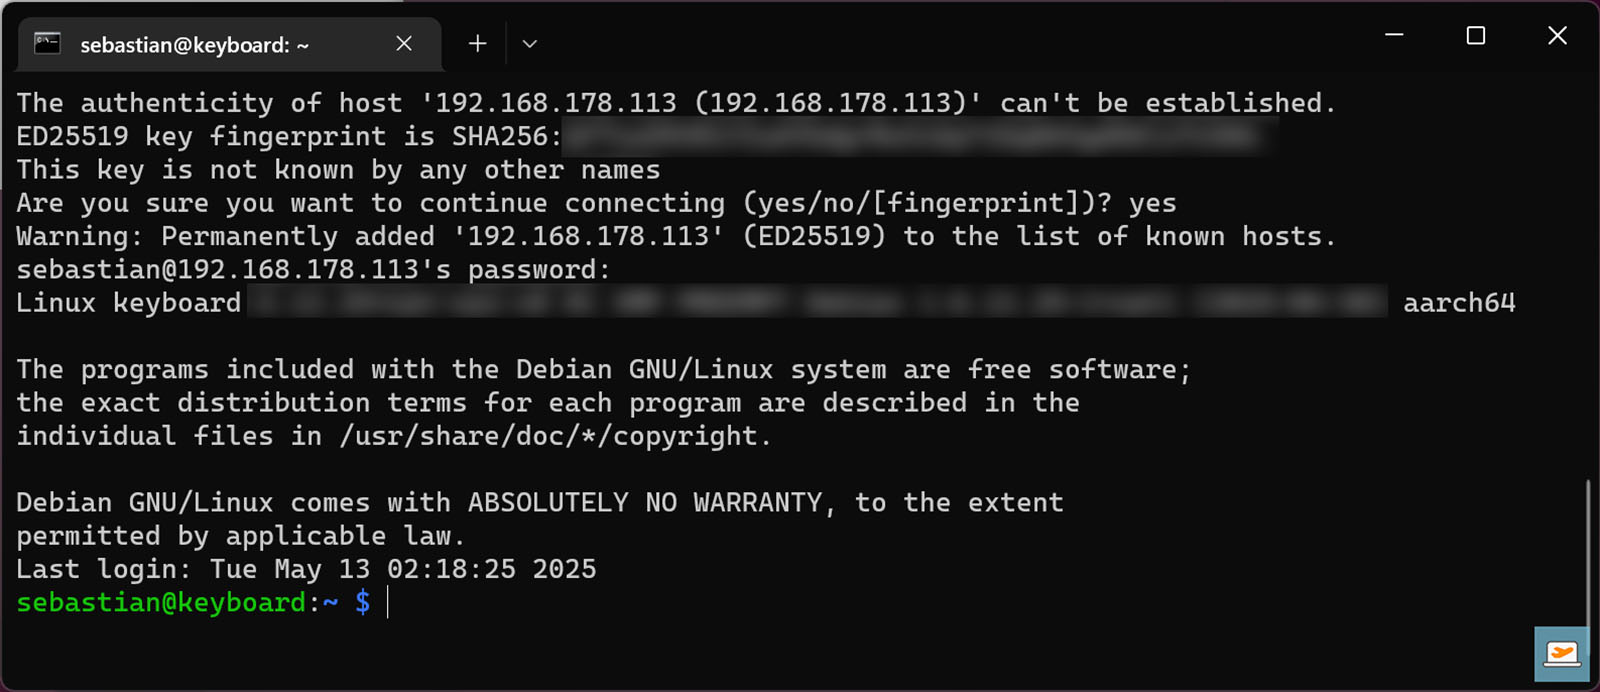
After that place the SD card in your Raspberry Pi, and connect it to a power source (either a power supply or the USB of your computer). Make sure to use the right microUSB at this point (the one that says PWR IN). Wait until the green light stops blinking, then it is fully booted and usable. Now we need to connect to the Raspberry Pi via SSH, which requires us to find its IP address. You can check that for example in your router settings. Once done, use the following command to connect to it in a command shell:
ssh <username>@<ip-address>
while replacing <username> and <ip-address> with your values, e.g.:
ssh sebastian@192.168.178.113
In the following you’ll be asked to accept a fingerprint to continue and then the password you selected while setting up the configuration in the Raspberry Pi Imager. After typing in the correct password, you should be logged in to your Raspberry Pi with a line that looks like this:
In case you’re playing around a lot and reinstalling the OS the connection will fail because the IP address stays the same while the fingerprint changes. You will receive the failure message WARNING: REMOTE HOST IDENTIFICATION HAS CHANGED! and the following command (replacing the IP address of course) will reset the fingerprint:
ssh-keygen -R 192.168.178.113
Prepare the “keyboard”
Now it’s time to setup our fake keyboard. For that we need to run the following commands to enable the gadget mode, which is used to simulate USB devices:
sebastian@keyboard:~ $ echo "dtoverlay=dwc2" | sudo tee -a /boot/firmware/config.txt

sebastian@keyboard:~ $ echo "dwc2" | sudo tee -a /etc/modules

sebastian@keyboard:~ $ sudo echo "libcomposite" | sudo tee -a /etc/modules
With the following commands we create a configuration file for our device that will be called on every startup of the Raspberry Pi:
sebastian@keyboard:~ $ sudo touch /usr/bin/usb_keyboard

sebastian@keyboard:~ $ sudo chmod +x /usr/bin/usb_keyboard
Next we need to make sure the configuration is called on every startup. There are different ways to achieve this and /etc/rc.local might not be the most modern one, but it was a working one for me. In Bookworm, the latest Raspberry Pi OS version, this method is not configured per default anymore, so the following is slightly different than in other tutorials.
First we need to open the file with the text editor nano:
sebastian@keyboard:~ $ sudo nano /etc/rc.local
The file should be completely empty as hinted above, so make sure to add the following three lines to it and save by pressing Ctrl+X follwed by Y and Enter:
#!/bin/sh -e

/usr/bin/usb_keyboard # libcomposite configuration

exit 0
By using the following commands we make sure that the OS has permissions to access and run the file:
sebastian@keyboard:~ $ sudo chown root /etc/rc.local

sebastian@keyboard:~ $ sudo chmod 755 /etc/rc.local
Now we need to setup the actual configuration for our keyboard by opening the previously created file:
sebastian@keyboard:~ $ sudo nano /usr/bin/usb_keyboard
Add the following content to it and save (Ctrl+X followed by Y and Enter):
#!/bin/bash

cd /sys/kernel/config/usb_gadget/

mkdir -p usb_keyboard

cd usb_keyboard

echo 0x1d6b > idVendor # Linux Foundation

echo 0x0104 > idProduct # Multifunction Composite Gadget

echo 0x0100 > bcdDevice # v1.0.0

echo 0x0200 > bcdUSB # USB2

mkdir -p strings/0x409

echo "fedcba9876543210" > strings/0x409/serialnumber

echo "Your amazing keyboard startup" > strings/0x409/manufacturer

echo "Raspberry USB Keyboard" > strings/0x409/product

mkdir -p configs/c.1/strings/0x409

echo "Config 1: ECM network" > configs/c.1/strings/0x409/configuration

echo 250 > configs/c.1/MaxPower

echo 0xa0 > configs/c.1/bmAttributes
# Add functions here
mkdir -p functions/hid.usb0
echo 1 > functions/hid.usb0/protocol
echo 1 > functions/hid.usb0/subclass
echo 8 > functions/hid.usb0/report_length
echo 1 > functions/hid.usb0/wakeup_on_write
echo -ne \\x05\\x01\\x09\\x06\\xa1\\x01\\x05\\x07\\x19\\xe0\\x29\\xe7\\x15\\x00\\x25\\x01\\x75\\x01\\x95\\x08\\x81\\x02\\x95\\x01\\x75\\x08\\x81\\x01\\x95\\x05\\x75\\x01\\x05\\x08\\x19\\x01\\x29\\x05\\x91\\x02\\x95\\x01\\x75\\x03\\x91\\x01\\x95\\x06\\x75\\x08\\x15\\x00\\x26\\xff\\x00\\x05\\x07\\x19\\x00\\x2a\\xff\\x00\\x81\\x00\\xc0 > functions/hid.usb0/report_desc
ln -s functions/hid.usb0 configs/c.1/
# End functions
ls /sys/class/udc > UDC
Finally we need to create a small Python script we can call remotely to initiate the keyboard pressing:
sebastian@keyboard:~ $ nano launch.py
Add the following content which will press the Space key twice and save again by using Ctrl+X, Y and Enter:
#!/usr/bin/env python3

NULL_CHAR = chr(0)
def write_report(report):
with open('/dev/hidg0', 'rb+') as fd:
fd.write(report.encode())
# Press SPACE key
write_report(NULL_CHAR*2+chr(44)+NULL_CHAR*5)
# Release all keys
write_report(NULL_CHAR*8)
# Press SPACE key
write_report(NULL_CHAR*2+chr(44)+NULL_CHAR*5)
# Release all keys
write_report(NULL_CHAR*8)
Test the keyboard
If you’ve done all of that correctly, you should be now able to test the keyboard. To do so, disconnect the Raspberry Pi from your computer and open the Device Manager on Windows taking note on how many keyboard devices you have at this stage. Reconnect the Raspberry Pi with the left microUSB port that allows data in- and output and wait until it gets fully started. Now you should see one more keyboard in the Device Manager.
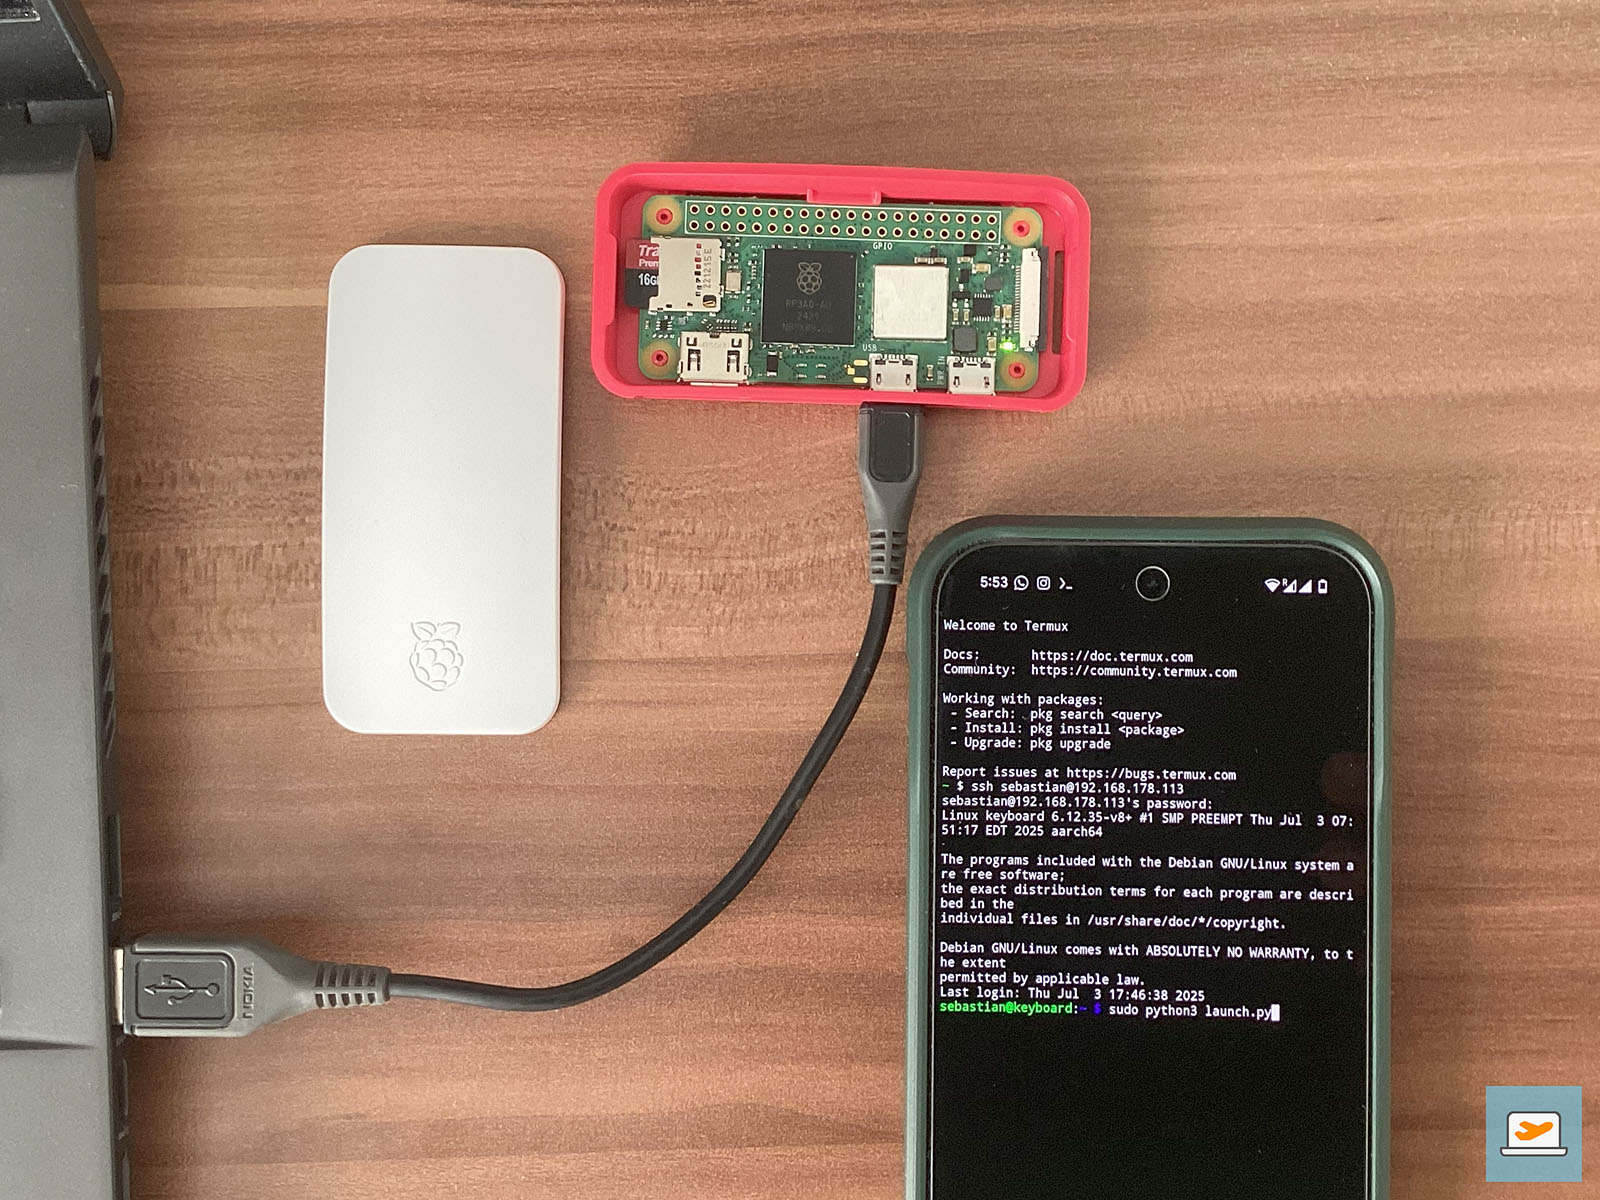
Open any text editor, place the cursor in it and connect to the Raspberry Pi via SSH from another device. This can be the smartphone you’re going to use to wake up your laptop remotely for example, just make sure that it is in the same network as your Raspberry Pi. I’ve used Termux for Android and can login there the same way as on Windows:
~ $ pkg install openssh // Required once to install the SSH client

~ $ ssh sebastian@192.168.178.113
When connected, run your launch script:
sebastian@keyboard:~ $ sudo python3 launch.py
If everything was setup correctly, you should see that two spaces were added in the text file on your computer. Try the same after setting your computer into energy saving mode (NOT hibernation mode!). This should not work anymore – if it does, your keyboard is ready. If it does not work, try another microUSB cable, that fixed it for me.
Prepare the kernel setup to enable waking up the computer
The waking up fails because there is an issue in the gadget mode that prevents the keyboard from waking up the computer. As this issue is on a low level, we need to modify the Linux kernel to fix it. The kernel is basically the core of the operating system, that communicates between the hardware and the applications. It also manages the hardware states and can send specific commands via output, for example our wakeup command.
To patch and build our own kernel we need our previously mentioned Linux installation, in my case Ubuntu 25.04 in a virtual machine. To prepare everything for the build process, we need to clone the GitHub repository containing the kernel’s source code and install all dependencies required for building. All the following commands are happening in the Terminal, for cloning the repository we also need to install Git, that is used for version control of the project:
sebastian@ubuntu:~$ sudo apt install git

sebastian@ubuntu:~$ git clone --depth=1 https://github.com/raspberrypi/linux

sebastian@ubuntu:~$ sudo apt install bc bison flex libssl-dev make libc6-dev libncurses5-dev
I mentioned earlier that we need to remember that we have installed a 64-bit system on the Raspberry Pi and for building the matching kernel we need to install the matching toolset:
sebastian@ubuntu:~$ sudo apt install crossbuild-essential-arm64
With that command we are done setting up our crossbuild environment. Crossbuild means that we are building the kernel on a processor, where it’s not supposed to run later. We could build it straight on the Raspberry Pi (a native build), but due to the lower processor performance, that would take much longer.
Patch the kernel
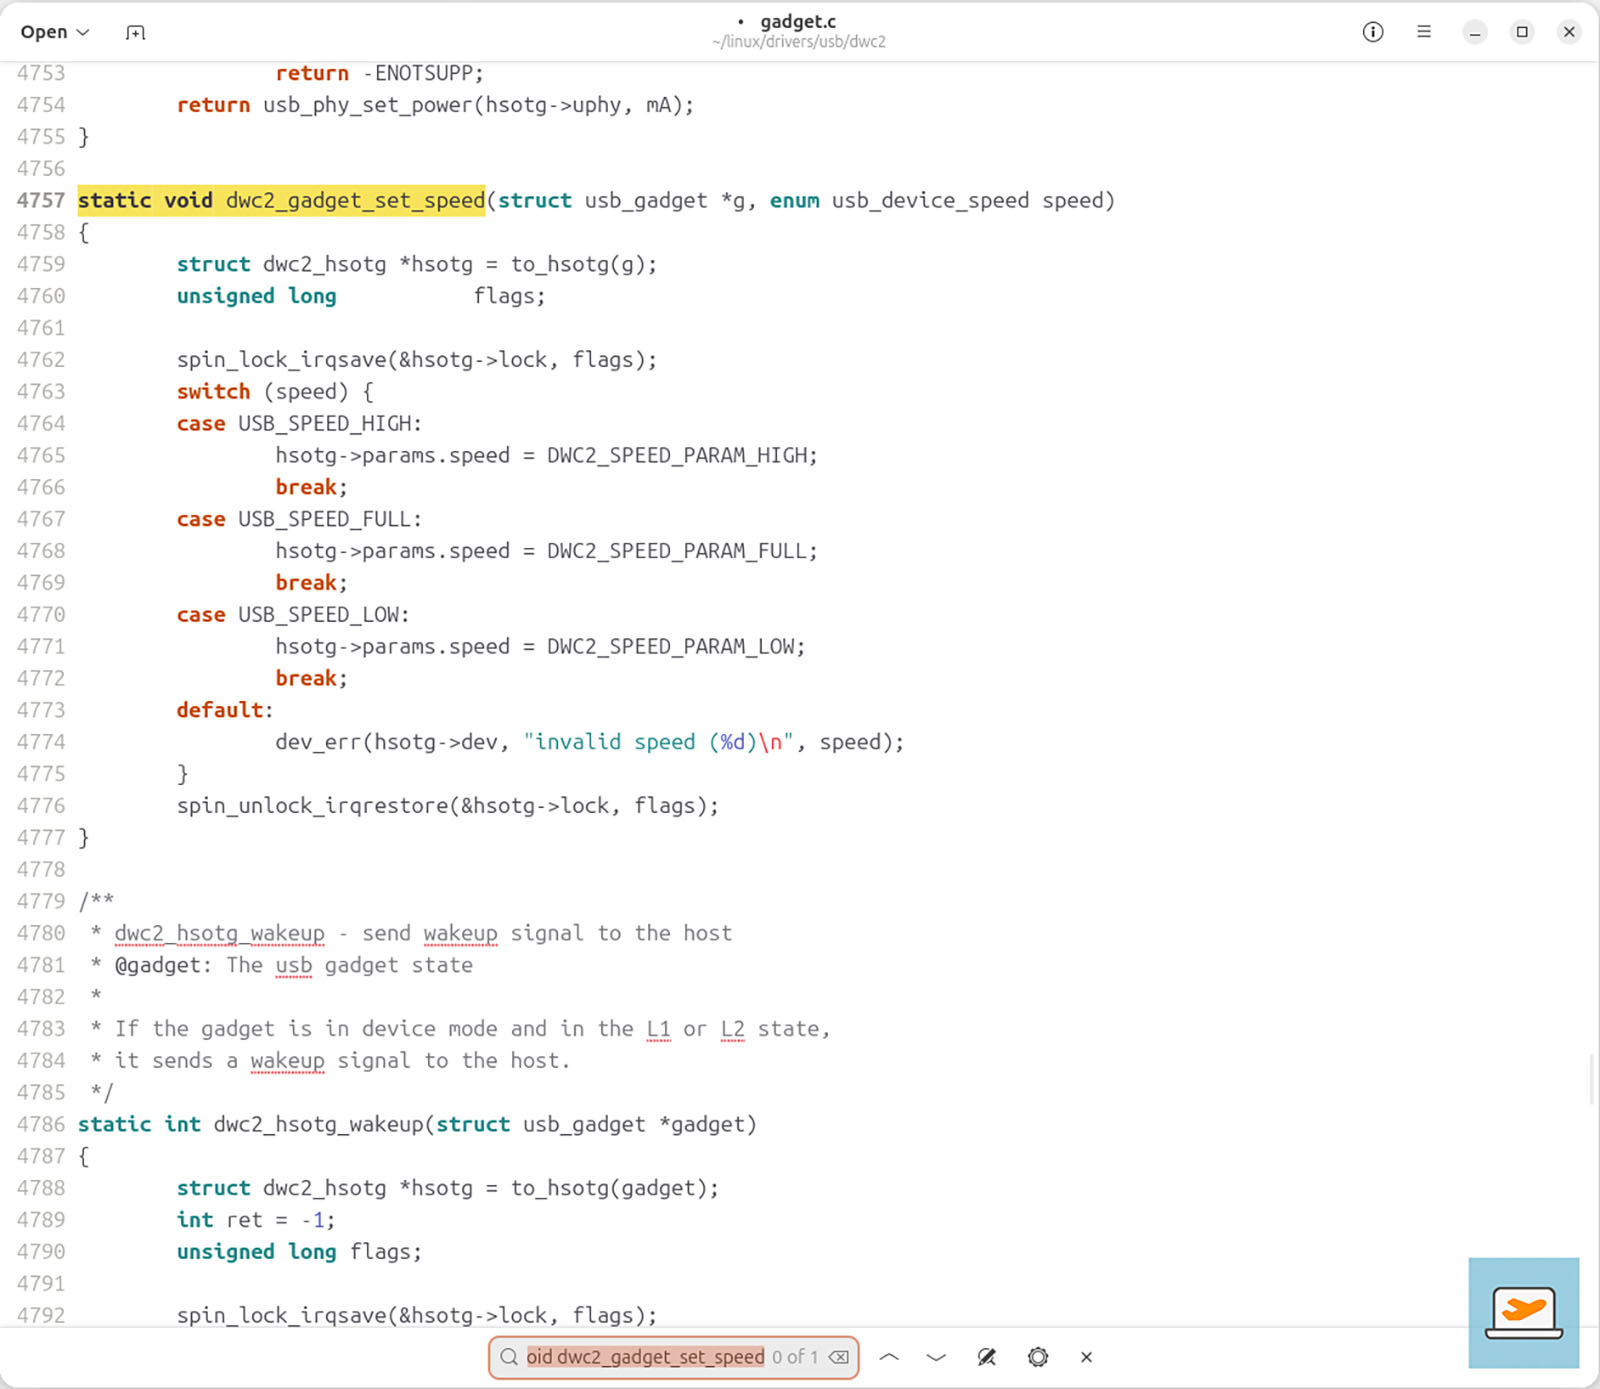
Now, open the file explorer in Ubuntu to patch the kernel. We need to modify three files to make sure that the kernel sends the wake up command to the laptop when a keyboard button is “pressed”. We do that based on this patch file and there might be automatic ways to do this but I prefer to do it manually in case any of the positions changes. Let me explain the process on one example modifying the first file, drivers/usb/dwc2/gadget.c:
After opening the File Explorer, you should see a linux folder. It contains all code of the Linux kernel running on your Raspberry Pi. Open it to see further folders to follow the path to drivers/usb/dwc2. There you’ll find the gadget.c file that we need to open for editing with a double-click. Now we need to find the first place were we have to add or modify code. In line 5 of the patch file you see that there is a function called static void dwc2_gadget_set_speed. We can search for that function in the file with Ctrl+F, and at the end of the function we’ll also find the line for spin_unlock_irqrestore(&hsotg->lock, flags); and the closing bracket. AFTER the closing bracket we can now copy-paste the green part in the patch file and once done, remove all the plus signs at the beginning. The file should now look like this:
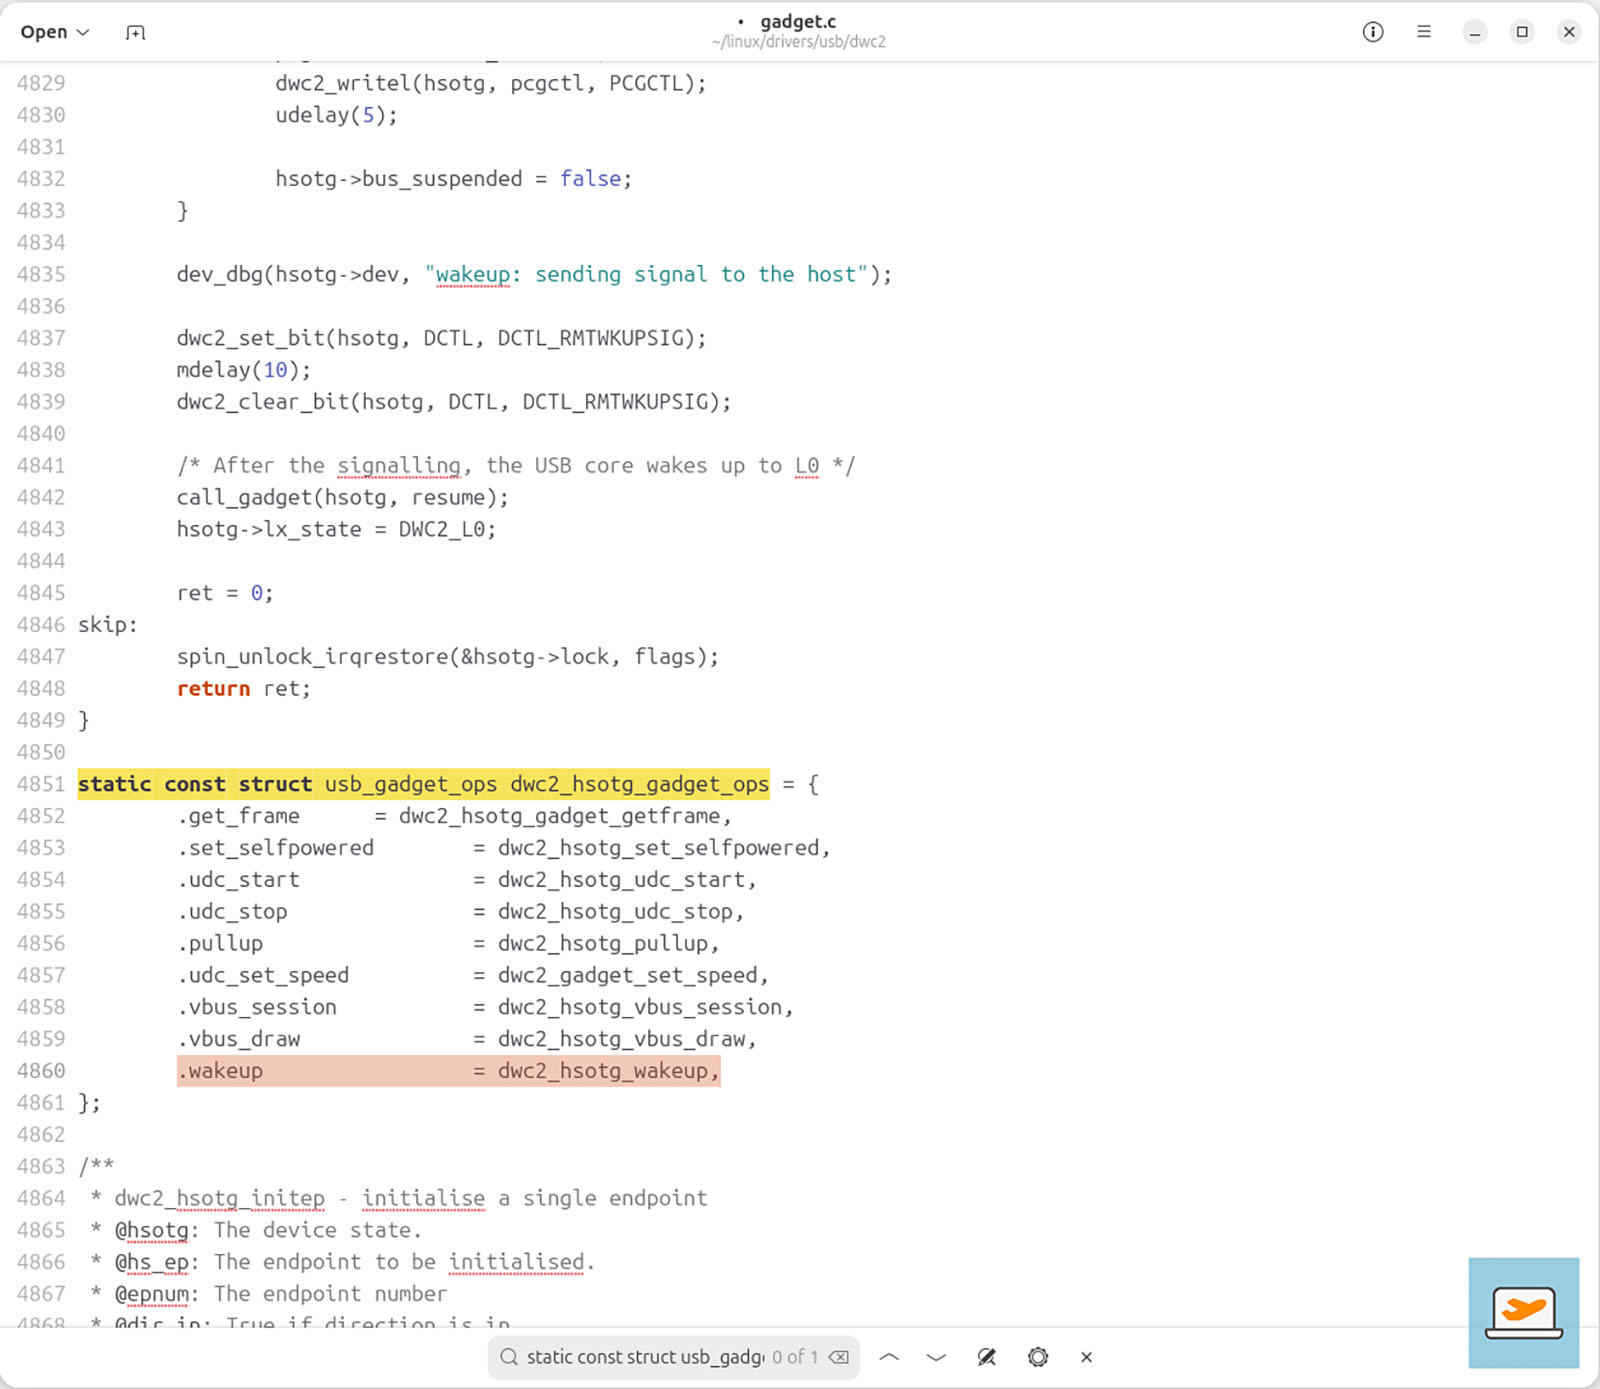
Same goes for the second edit of this file adding the .wakeup = dwc2_hsotg_wakeup, part. Look for the content in the line after the purple line numbers by using Ctrl+F (also to make sure, that this place is there only once) and then add the correct code at the correct spot:
Do the same for drivers/usb/gadget/function/f_hid.c and drivers/usb/gadget/function/u_hid.h as described in the patch file, saving and closing each file after successful editing.
Build and install the kernel
Once you’ve done all changes it’s time to build the kernel with our modifications. To do so, go back to the terminal and run the following three commands. The first one moves the position of the terminal into the linux folder, the second sets a variable for the kernel name and the third creates a configuration file.
sebastian@ubuntu:~$ cd linux

sebastian@ubuntu:~/linux$ KERNEL=kernel8

sebastian@ubuntu:~/linux$ make ARCH=arm64 CROSS_COMPILE=aarch64-linux-gnu- bcm2711_defconfig
To build the kernel, run the following command – bear in mind, this can take a while:
sebastian@ubuntu:~/linux$ make ARCH=arm64 CROSS_COMPILE=aarch64-linux-gnu- Image modules dtbs
Once done, connect the SD card itself to your Linux system, where you just built the kernel. As I was not able to connect my laptop’s internal SD card reader to my virtual machine I used an external USB card reader to achieve this. First we need to identify our device by running the command lsblk in the terminal:
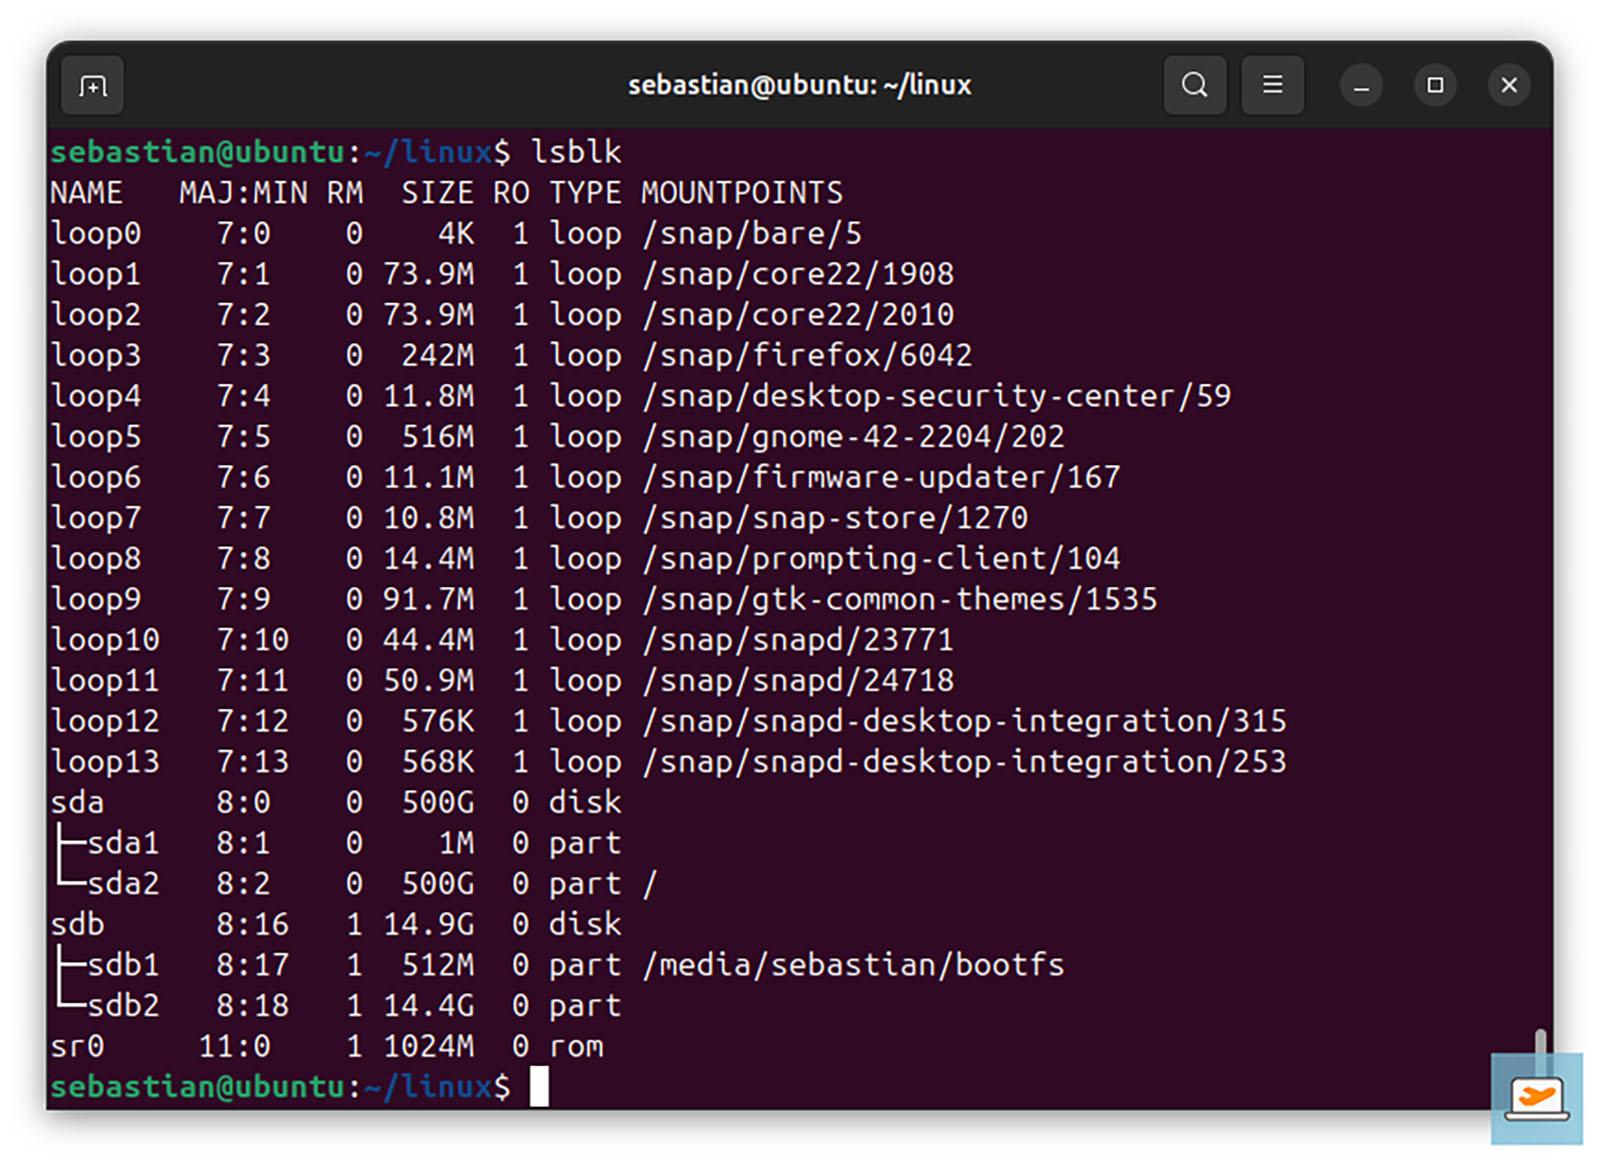
You can see, the device sdb is a 16GB SD card divided in two partitions sdb1 and sdb2. To mount the card for our installation, we have to run the following commands:
sebastian@ubuntu:~/linux$ mkdir mnt

sebastian@ubuntu:~/linux$ mkdir mnt/boot

sebastian@ubuntu:~/linux$ mkdir mnt/root

sebastian@ubuntu:~/linux$ sudo mount /dev/sdb1 mnt/boot

sebastian@ubuntu:~/linux$ sudo mount /dev/sdb2 mnt/root
Now we can install all required files of the new kernel in both partitions:
sebastian@ubuntu:~/linux$ sudo env PATH=$PATH make -j12 ARCH=arm64 CROSS_COMPILE=aarch64-linux-gnu- INSTALL_MOD_PATH=mnt/root modules_install

sebastian@ubuntu:~/linux$ sudo cp mnt/boot/$KERNEL.img mnt/boot/$KERNEL-backup.img

sebastian@ubuntu:~/linux$ sudo cp arch/arm64/boot/Image mnt/boot/$KERNEL.img

sebastian@ubuntu:~/linux$ sudo cp arch/arm64/boot/dts/broadcom/*.dtb mnt/boot/

sebastian@ubuntu:~/linux$ sudo cp arch/arm64/boot/dts/overlays/*.dtb* mnt/boot/overlays/

sebastian@ubuntu:~/linux$ sudo cp arch/arm64/boot/dts/overlays/README mnt/boot/overlays/
And finally we can unmount the partitions and remove the SD card:
sebastian@ubuntu:~/linux$ sudo umount mnt/boot

sebastian@ubuntu:~/linux$ sudo umount mnt/root
Finally, it’s time to test everything. Therefore place the SD card back in your Raspberry Pi and connect it to your computer. See, if you get any errors, if the additional keyboard appears in the Device Manager and if you can call the launch.py script via SSH from your phone (sudo python3 launch.py). If so, then Congratulations! 🙂
Configuring remote access
Now calling the launch script only worked if the Raspberry Pi and the initiating device (your smartphone) were in the same physical network. We need to change this, so we can call the script even from being hundreds of kilometers away. I do this in the following by using Tailscale to create a virtual network which ignores physical boundaries. To do so we need to install Tailscale on the Raspberry Pi according to the installation instructions after reconnecting to the Raspberry Pi via SSH:
sebastian@keyboard:~ $ curl -fsSL https://pkgs.tailscale.com/stable/debian/bookworm.noarmor.gpg | sudo tee /usr/share/keyrings/tailscale-archive-keyring.gpg >/dev/null

sebastian@keyboard:~ $ curl -fsSL https://pkgs.tailscale.com/stable/debian/bookworm.tailscale-keyring.list | sudo tee /etc/apt/sources.list.d/tailscale.list

sebastian@keyboard:~ $ sudo apt-get update

sebastian@keyboard:~ $ sudo apt-get install tailscale

sebastian@keyboard:~ $ sudo tailscale up
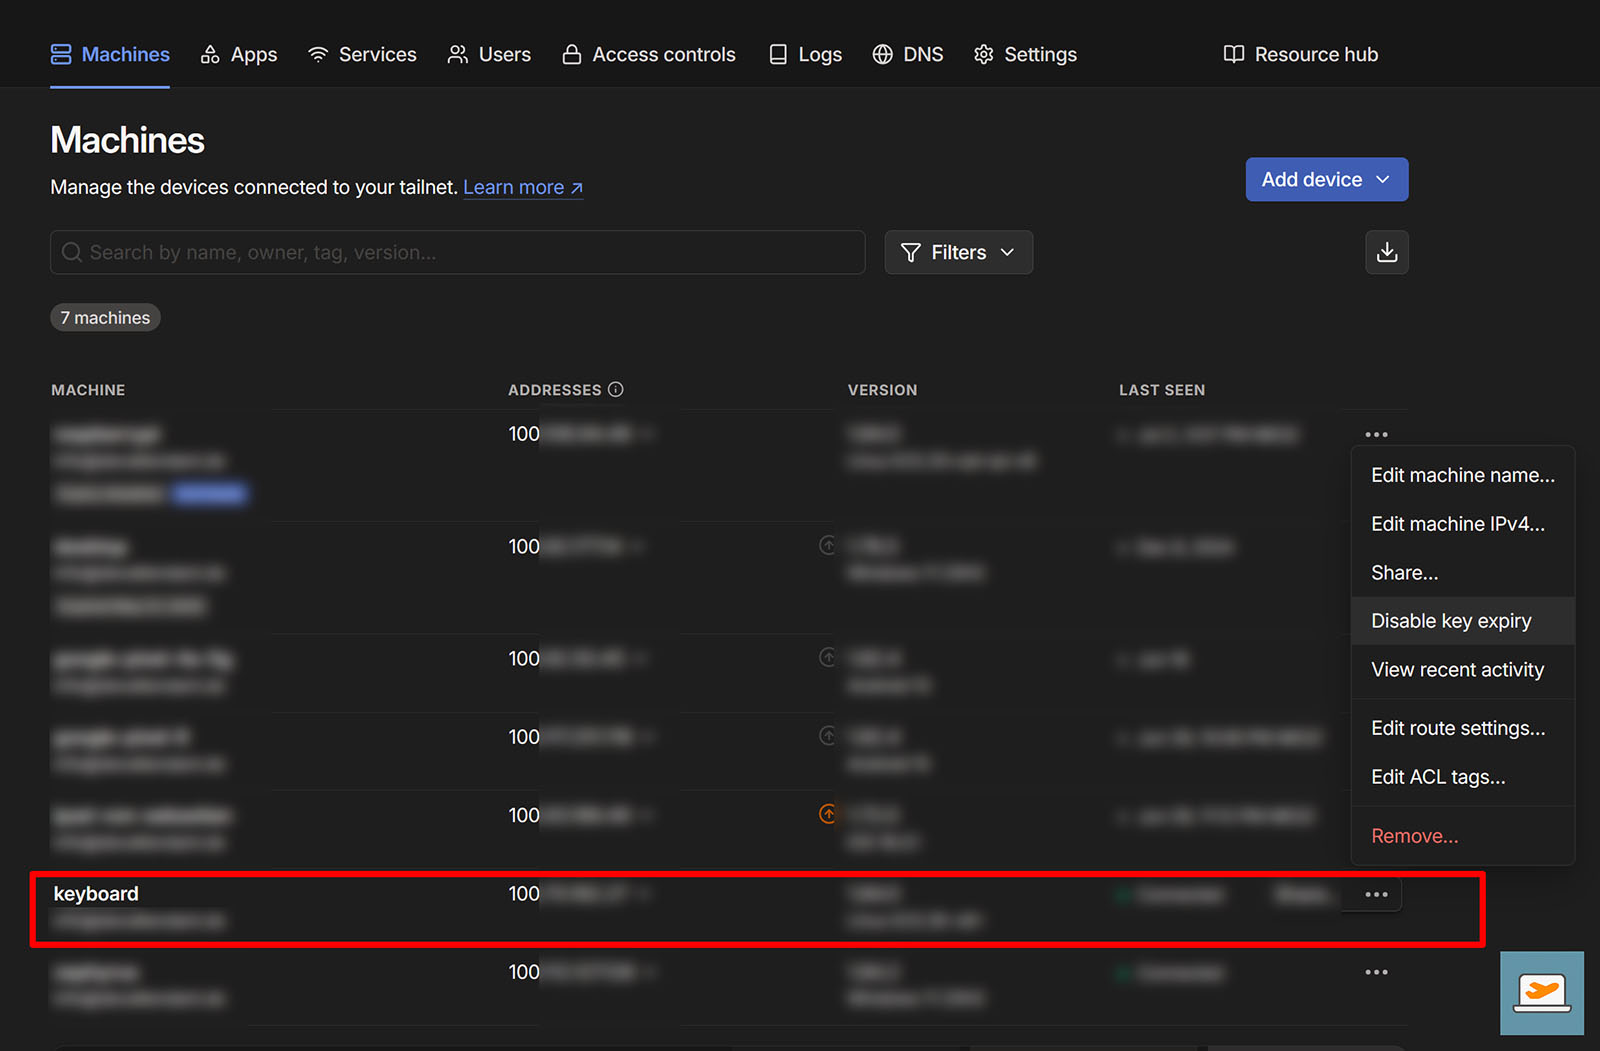
After the last command you will get a link to connect the Raspberry Pi to your own virtual network. If you haven’t created one yet, sign up on the website and download the Android app to add your device there as well. Once the Raspberry Pi is connected, you can see it in the Machines list with an IP adddress. I’d also recommend to disable the key expiry for our keyboard, so you don’t have to worry about having to re-setup anything. Just make sure to remove the device from the Machines list, if it should get stolen or lost (but you should do that with an expiry anyway).
Now we can test the setup:
- Disconnect your smartphone from the same physical network where your keyboard is (use mobile data for example)
- Run the Tailscale app on your phone and connect to your virtual network
- Have a look into the Machines list or run tailscale ip -4 on your keyboard to get its IP address
- Connect to your keyboard via SSH and the virtual network’s IP address (in my case ssh sebastian@100.70.xxx.xxx)
- Run the well-known command sudo python3 launch.py
- See two spaces added to your text editor or your computer woken up from sleep
- Voila! 🙂
Bonus: Use AccessPopup for easier WiFi setup while travelling
In my case I’ve also installed AccessPopup on my Raspberry Pi, as it might happen that I’m moving with my laptop for a longer period. For example I’m at home in Germany or in Australia. There’s no easy way (at least I haven’t found any) to tell the Raspberry Pi to connect to unknown WiFi networks, when you can’t establish any connection to it. So the AccessPopup script runs every two minutes and checks if there is a WiFi connection established. If not, it creates its own hotspot, where you can connect to from any device to then establish an SSH connection to setup the new WiFi. Otherwise you’d need to do this in the Raspberry Pi Imager and therefore do the whole tutorial again.
To install AccessPopup, we’re following the script’s instructions with the following commands:
curl "https://www.raspberryconnect.com/images/scripts/AccessPopup.tar.gz" -o AccessPopup.tar.gz

tar -xvf ./AccessPopup.tar.gz

sudo ./AccessPopup/installconfig.sh
Select Option 1 by pressing 1 and Enter to install the script required for the automatic network checks. This will also start the monitoring to reach the expected behavior described above. Now, when being at a new place, connect the Raspberry Pi to power, wait until it boots and detects, that there is no WiFi network available. Then it will create it’s own network calles “AccessPopup” with the default password “1234567890” (which you should change through the installconfig.sh script). Connect to this hotspot and establish an SSH connection by using the keyboard’s static IP address in this case, which – according to AccessPopup’s documentation – is 192.168.50.5.
Summary
Now you have a small Raspberry Pi Zero, that acts as a remotely controllable USB keyboard that you can use to wake up your computer even if it does not provide Wake on AC or Wake on LAN. Waking up only works from energy saving mode, not when the computer is in hibernation or shut down. Another alternative solution would be to use a Fingerbot to really press any button. But all of these devices require any kind of smarthome hub – and need to be physically attached to your device.
Sources:
RandomNerdTutorials.com, @mdevaev on GitHub for identifying the wake up issue and finding a fix, @rmed on GitHub for more details about the bmAttributes config, RaspberryPi.com, Tailscale, RaspberryConnect.com